LakeTravis.com has a new plugin that completely automates our Upcoming Events page. You post an Event to your Facebook page and our plugin will fetch and display those events automatically 3 different places on LakeTravis.com. You events will be displayed on our mainpage, on our Upcoming Events page and on your page on LakeTravis.com. Our Upcoming Events page is one of the best viewed on the site.
Here’s a quick tutorial on building a Facebook event for your business. Before starting 1) be logged into your FB page, 2) have an image (photo) in mind and ready on your computer and 3) have a nice descriptive of the event, sale or offer prepared to copy and paste in the descriptive area.
A) We start on your Main Facebook Page.

B) On the left hand side of your Facebook mainpage click on the Events link (circled in red above). This will take you to your Events Page (see the page below). If there is no “Events” item in the left toolbar, look at the top of your timeline (middle column). In the box where you would build your next post, there is an Event button on the Create Post line. You can also click there. This will take you to your Events Page (see the page below). If you’ve never posted an event this page will be empty. If you’ve posted events before the previous events will be displayed here. Both past and upcoming.
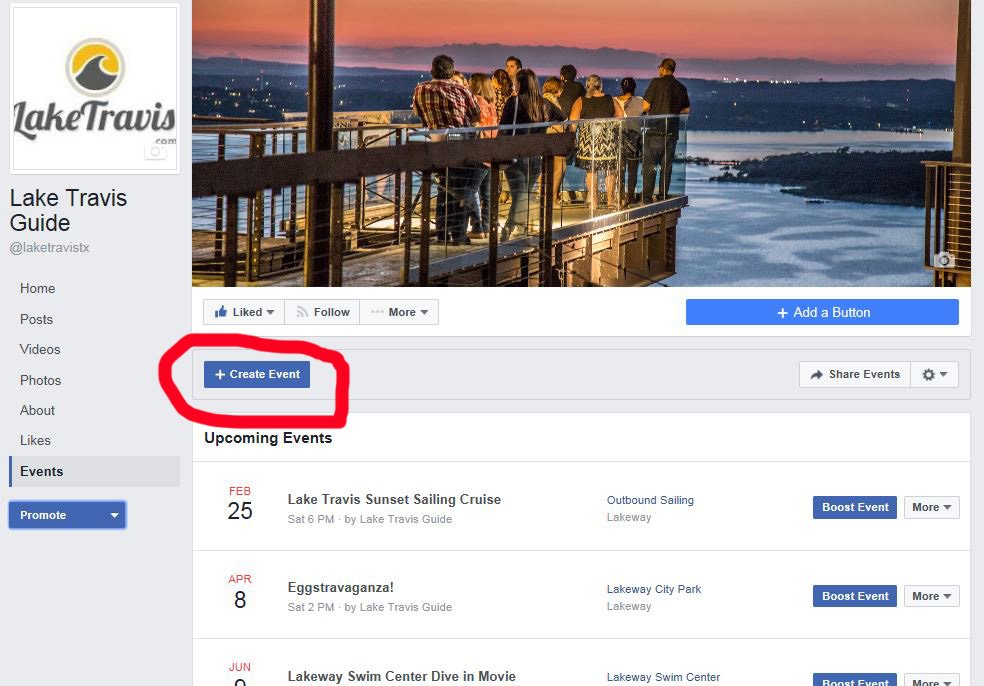
C) On your Events Page (above) click the Create Event tab (circled in red). This will bring up a pop-up (see below). That is the page on which you will construct your event.

From here just follow the Red Numbers (above) to complete your Event.
- The Image. This is the image area for your event. Be sure and place an attractive relevant photo here. Just click in the box and you can load a photo from anywhere.
- Name the Event. Title your Event here. You need not put your business or venue name here, just the title of the Event. (example: Tuesday Night BOGO Burger Night)
- Location. Start typing your business name here. Your Facebook page should pop-up under the box. Click on your FB page pop-up which should place it in the box. Now your location is set to your business.
- Frequency. This great feature lets you add recurring events. If you have a Tuesday BOGO Burgers Nite or a Monday karaoke night etc.. You build the listing once, telling it the date when to occur first and when to stop.
- Pick the start and end times. This is the date and time the single or recurring event starts and the time the event ends. You’re putting in just the date for the 1st event. If you selected recurring it will reproduce that event on the other dates you’ve chosen.
- Co-Hosts – Here you can type in the names of any businesses that may be co-hosting the event. A business partner, a band, etc. Lot’s of our partners make Lake Travis Guide (our FB page) co-hosts as your events will show up on our FB page. Just like the location box, just start typing in the co-host’s name and FB should ID the co-host FB page and prepopulate it.
- Pick the Category that best fits your event. Sometimes there is one that fits, sometimes not.
- Description. Here is where you write your Event Description. (Example: Come join us tonite for our buy one get one free burger night.). Do not get lazy here. The better the descriptive the more folks you’ll have interested and attend. Links work in this box. If it’s a band, link to the band’s website, a video of them or a link to their SoundCloud page where their music can be heard. Again, the more detailed the descriptive, the more meaningful the event. This is not the place to short-cut.
- Keywords. You can add some keywords here. We usually don’t use this, but it’s probably a good idea.
If you are selling tickets to your event you can link to the ticket page. If it’s a free event you can still use this to link to a page on your site with more info about the event. Just copy and paste the URL in the box. Look over everything, if satisfied you can click Publish and you’ve posted your Event.
We fetch events twice a week – at noon on Mondays (to catch your new weekday events) and at noon on Thursdays (to catch all your weekend events). Try and get your FB Events postings done before those days of the weeks and times. IE….if you do a FB post at 11 am on Thursday, it will be on our site by 1:00 pm that same day. If you build that post at 2 PM on Thursday, it will not get fetched and displayed on LakeTravis.com until our Monday fetch.
NOTE: Adding these events will publish them to your timeline. We typically go to our timeline (when we are adding many events) and click Hide From Timeline, so 4-5 events don’t show up on your timeline in a row, all at once.
We do Facebook Events phone tutorials all the time. If your attempting your 1st event, or just need a “best practices” refresher, feel free to call (512) 261-5121 with any questions. We can help you build your 1st Facebook event in less than 10 minutes. Happy Event Posting !!!!!!!